Data Processing Operations
- Data Processing Overview
- Key Terms
- Operation
- Transaction Table
- Master Table
- Result Table
- Linking Key
- Violated Expression Table
- Alpha Anywhere Operations
- Append records
- Mark, Unmark, and Delete records
- Mark, Unmark, and Delete Duplicate records
- Export and Import
- Post data
- Query records
- Update records
- Convert case of fields
- Search and replace text
- Copy records
- Crosstab
- Intersect records
- Join tables
- Subtract records
- Summarize records
- Operation Genies
- Operation Builders
- Using the Import Operation Genie
- Appending and Updating Records
- Append Builder
- Operations Short-Cut
- Using the Post Data Operation
- Understanding Posting
- Master Table
- Transaction Table
- Master Table
- Summary
- What's Next?
Description
Alpha Anywhere database Operations help you handle large data manipulation tasks. Some typical Operations that you can perform with an Alpha Anywhere database are: add records from one table to another table, import or export spreadsheets or text files, post values from one table to another, and update the field values in all, or a subset of records; just to name a few. In this lesson, you learn how to create and use Alpha Anywhere data processing Operations.
Data Processing Overview
In Alpha Anywhere, you can change data at any time by selecting a record and entering new values. This method works well when you are editing a few records, but can become very time consuming when you are working with hundreds or thousands of records. To handle larger data manipulation tasks, you can use an Alpha Anywhere Operation. Typical Operations might include the following tasks:
Change all field values to uppercase or lowercase.
Summarize or cross-tabulate records in a table.
Mark or Delete duplicate or out-of-date records.
Add records from one table to another table.
Import or Export spreadsheets or text files.
Post values from one table to another table.
Update the field values in all, or a subset of records.
Key Terms
Becoming familiar with the following terms will help you understand Alpha Anywhere Operations.
Operation
A process in which Alpha Anywhere manipulates data. Data might come from one or more tables.
Transaction Table
A table used in an Operation which generally is not changed by the Operation.
Master Table
A table used in an Operation which generally is changed by the Operation.
Result Table
Contains the output of an Operation, depending on the Operation type.
Linking Key
A common value between records in different tables.
Violated Expression Table
A table created by certain Operations if the field rules of the master or transaction table will be violated by the Operation.
Alpha Anywhere Operations
Alpha Anywhere has a variety of Operation types that let you transform data. The following table describes Alpha Anywhere Operations.
Append records
Adds records from the transaction table to the master table.
Mark, Unmark, and Delete records
Marks, unmarks, or deletes records in the master table, according to criteria you specify.
Mark, Unmark, and Delete Duplicate records
Marks, unmarks, or deletes duplicate records in the master table.
Export and Import
Sends to and receives records from common file formats, such as ASCII text and those used by Microsoft Excel and Lotus 1-2-3.
Post data
Adds, subtracts, or replaces values in the master table with values from matching records in the transaction table.
Query records
Selects and sorts specific records in a table, and saves the query for future use.
Update records
Changes values in the master table using criteria you specify.
Convert case of fields
Changes text to uppercase, lowercase, or mixed case in one or more fields.
Search and replace text
Searches in one or more fields for a value, and replaces it with another value.
Copy records
Copies selected records from a table or a set to a new table, the result table. You can use copy with a set, to copy values from multiple tables to a single table.
Crosstab
Creates a result table whose field names correspond to field values in the master table. The field data are cross tabulated summary values.
Intersect records
Creates a result table with records that are common to both the master and transaction tables.
Join tables
Create a result table containing fields from both the master and transaction tables.
Subtract records
Creates a result table by subtracting records in one table from another table.
Summarize records
Creates a result table that summarizes records in the input master table.
Operations have settings that you can save; so when re-running the same Operation, you do not have to define it again.
Operation Genies
Alpha Anywhere has several Genies to help you perform common Operations. The Genies guide you step by step through creating an Operation. Genies can help you perform complex Operations, such as Update Operations, that can do the following tasks:
Search for a string in a field and replace it with another string.
Assign a constant value to a field.
Break a single name into its parts; for example, separate first name and last name fields.
Break a city, state, zip field into its parts; for example, separate city, state, and zip fields.
Assign serial values to a field; for example, record 1: A100, record 2: A101, record 3: A102, and so on.
Assign random values to a field.
Assign a constant value to field, or delete a field value.
Compute the number of days between two date values.
Compute time interval between two time values.
Operation Builders
If you prefer not to use an Alpha Anywhere Genie for performing an operation, you can define the operation yourself using the appropriate operation builder, such as the Copy Builder or the Export Builder. You define the operation by filling in the fields of the builder. Even if you prefer to work with the operation builder directly, you can still use the operation genie to fill in the builder for you and then edit the settings in the builder that the genie creates.
Using the Import Operation Genie
Alpha Anywhere lets you import table data from a variety of sources by using an Import Operation. Additionally, the Alpha Anywhere ODBC Import Genie ( File > Import > ODBC Import Genie ) lets you import data from any ODBC data source, including Microsoft Access, Excel, Outlook, Exchange, SQL Server, Visual FoxPro (versions later than v2.6), and Paradox into an Alpha Anywhere table. In the following procedure, you use an Import Operation to add records to the Customers table in AlphaMovies. You use the Operations tab in the Control Panel to create a new Operation. The Create New Operation dialog box lets you select the Operation you want to perform. To create an Import Operation using the Genie:
Open the AlphaMovies database.
You should have already created the AlphaMovies database in the Creating a Database lesson.In the Control Panel, click the Operations tab, and click New. The Create New Operation dialog box appears.
Select "Import Records", and click Create Using Genie. The Import Genie dialog box appears.
Click Next. The Import File Type dialog box appears.
You can import data in ASCII text, spreadsheet, and other file formats.

Select "ASCII text file", and click Next. The Import File Name dialog box appears. Indicate the location of the file you want to import.
Click the Folder button and navigate to your Alpha Anywhere program installation folder, usually the "C:\Program Files\A5V5\Samples" and "C:\Program Files\A5V5\AlphaSports" directories.
Select the "customer.asc" file, and click Open. Alpha Anywhere fills the file name and path in the File Name text box.
Click Next. The Import Destination dialog box appears.
Next, you select where to place the imported data. You can add the imported data to an existing table, or use it to create a new table in the database. Generally, it is a good practice to initially import data into a separate table from the destination table, so you can be sure that the results of the import are what you want before adding them to a table that holds your valuable data.
Select Import the data into a new table and click Next. The ASCII File Import dialog box appears.
Specify the format of your data: Character delimited and click Next.
In the next dialog box, select "Comma" and "Double Quotes", and click Next. The Field Information dialog box appears.
In this dialog box, you can select the fields that Alpha Anywhere imports. In addition, you can define new Field Properties. To exclude a field from the Import Operation, check the Skip (do not import) field option.
At the top of the dialog box, check First row of file contains field names, and click Next. The Result Table dialog box appears.
Click the Folder button, and select More Files.
In the Save As window, navigate to the AlphaMovies directory, type in the file name "Temp", and click Save.
Click Next. The Finish dialog box appears.
When developing Operations using Genies, the Finish dialog box gives you the following three choices:
Run the Operation without saving it.
First save the Operation, then run it.
View how the Genie has filled in the Operation Builder.
Selecting the last option helps you learn how the Genie creates the Operation, and gives you insight on how the Operation works. You can also change the information in the Builder at this step to more closely meet your needs.
Select Don't run the Import Operation now, just show me how the Genie has filled in the Import Builder and click Finish. The Import Builder appears with the import operation information filled in.
To see the Xbasic code that Alpha Anywhere generates for this Operation, click the 'XB' button or Show Xbasic Code button on the toolbar. The Save as Script option lets you save this Import Operation Xbasic code for future reuse.
Click Close, to close the Xbasic window.
On the toolbar, click the Run button. The Import Operation Result window appears.
Click View Result. The Temp table Default Browse appears containing the imported Customer data.
Close the browse, and close the Import Builder. Do not save the current import.
Click the Table/Sets tab in the AlphaMovies Control Panel. The new Temp table appears.
In this exercise, you created a new table in AlphaMovies with 60 records, by importing customer data from an ASCII file. In the next section, you use the Append Operation to add the new records to the AlphaMovies Customers table.
Appending and Updating Records
Now you have two tables in AlphaMovies which store customer data. The Append Operation takes the records from the transaction table, in this case, the Temp table, and adds them to the data in the master table, the Customers table. Since the structure and field names of the master and transaction table are not the same, you specify Append settings to inform Alpha Anywhere which fields in the master table match fields in the transaction table; these settings are referred to as the field mapping.
Append Builder
The Append Builder lets you do the following tasks:
Append tables with different field names.
Append only the fields you select.
Append only certain fields, conditionally.
Modify transaction data before appending.
Append only some of the transaction records.
Append only the non-duplicate transaction records.
Overwrite matching records in the master table to avoid duplicates: You specify the criteria for determining duplicate records.
Update a field in the individual transaction records to indicate whether that record was appended or used to replace a record in the master table.
Save your Append settings for future use.
To create an Append Operation using the Genie:
In the AlphaMovies Control Panel, display the Operations tab, and click New. The Create New Operation dialog box appears.
Select "Append Records", and select the master table in this Operation, the "Customers" table.
Click Create Using Genie.
In the Transaction Table dialog box, select the "Temp" table, and click Next.
In the Common Field Names dialog box, select No, fields in each table have different names and click Next. The Match Field Names dialog box appears.
In this dialog box, you must specify a matching field in the Temp table for each field in the Customers table. If you leave a blank entry in the Temp table, the corresponding field in the Customers table will not contain data.
Select to Match Fields by: "Names that sound alike", and click Suggest Field Mappings. Alpha Anywhere fills in fields with similar names.

Fill in the following matching fields, and leave the others blank.
- Customers
- Temp
- Customer_Id
@Temp->Customer_Id
- Company_Name
@Temp->Company
- Prefix
-
- First_Name
@Temp->Firstname
- Middle_Initial
-
- Last_Name
@Temp->Lastname
- Title
-
- Department
-
- Phone_Number
@Temp->Phone
- Fax_Number
@Temp->Fax
- Other_Phone_Number
-
- Address
@Temp->Bill_Address_1
- City
@Temp->Bill_City
- State_Province
@Temp->Bill_State_Region
- Postal_Code
@Temp->Bill_Postal_Code
- Country
@Temp->Bill_Country
- Note
-
Click Next. The Duplicate Record Action dialog box appears.
You can have Alpha Anywhere check for duplicate records prior to appending them. In addition, you can specify how Alpha Anywhere handles duplicate records when they are found. For example, if you have Alpha Anywhere check for duplicate records, you can select to have the record excluded from the Append Operation, or you can replace the existing duplicate record with the imported record.
Select No (appends all records, including duplicates) and click Next. The Select Records dialog box appears.
You can use a filter expression to select the records from the transaction table to be copied to the master table. For example, if you want to append a table of U.S. customers to a table of New York customers, you use a filter expression to select only the U.S. records in which the State field is equal to New York.
Select All Records and click Next. The Transaction Table Options dialog box appears. When performing an Append Operation, it is sometimes helpful to see which records were appended and which were replaced, if you selected to replace the existing record in the master table with the record from the transaction table. You can do this by specifying that the Append Operation updates the transaction table.
Select No and click Next. The Finish dialog box appears.
Select Don't run the Append Operation now, just show me how the Genie has filled in the Append Builder. The Append Builder appears with the Append Operation information filled in.
Click the Run button. An Append Operation confirmation dialog box appears.
Click OK. The Append Operation Result dialog box appears.
Click View Result. The Customers table Default Browse appears containing the appended customer data from the Temp table.
Close the Append Builder, and select to not save changes to current append.
Operations Short-Cut
When viewing records in a form or browse, you can use the Records menu for quick access to the following Alpha Anywhere Operations. To access Operations using the Records menu:
Click the Forms tab in the AlphaMovies Control Panel.
Double-click on the Customer Contacts form.
Select the Records menu.
Alpha Anywhere lets you perform the following Operations on any record or records that you select: Append, Copy, Delete, Mark, Unmark, Move, Export, and Update. Use the following steps to update the Company field values for the records of the Customers table.
Select Records > Update Selected Records. The Update Fields dialog box appears.
In the dialog box, select "Company_Name" from the Fieldname drop-down list box, and enter empty double quotes ("") in the Update Expression field.
This expression sets the specified field values to NULL.
To view the Xbasic code for this Operation, click the 'binocular' icon in the lower left corner of the dialog window.

If you want to save the Update definition for future reuse, click the Save as Script button on the dialog box window.
In the Save Script dialog box, name the script "DeleteCompanyName", check Put script on Favorites list, and click OK.
Now you can easily re-run the Update Operation (DeleteCompanyName) from the Scripts menu Favorites List.
Click OK in the confirmation message box, and Close in the Xbasic Code dialog box.
Click OK in the Update Fields dialog box to perform the Update Operation, and Yes in the confirmation dialog box.
View the updated records in the Customer Contacts form.

All the Company Name field values are now blank. In the next section, you learn how to use the Post Data Operation.
Using the Post Data Operation
The Post Data Operation adds, subtracts, or replaces values in the master table with values from the transaction table. For example, you can keep a running total of weekly or monthly sales by posting an Invoices total field, using the Add Operation, to a grand total field in another table. Or, you can track the decline of product inventory levels using the Subtract Operation. The transaction table from which you post values must have fields in common with the master table. The common fields are called linking key fields. You post data between records with matching linking keys.
Understanding Posting
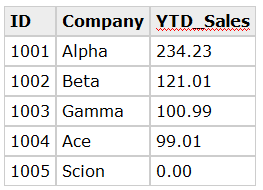
In this example, the master table contains the following year-to-date sales, as of the end of June.
Master Table
Each month, an Invoice table (the transaction table) is maintained. A subset of the records in the Invoice table for July appears as follows.
Transaction Table
- ID
- Sales
- 1001
23.40
- 1002
121.21
- 1001
11.21
- 1003
98.77
- 1001
34.56
- 1004
77.77
- 1005
21.12
- 1002
12.13
- 1001
11.11
- 1004
45.56
- 1004
12.34
- 1005
34.90
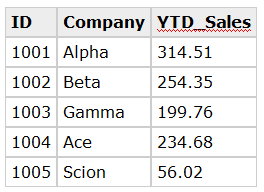
Each company places multiple orders during the course of the month. as you can see, there are multiple records for each ID. At the end of the month, the YTD_Sales value in the master table is updated by the Sales values in the transaction table. For example, at the beginning of July, YTD_Sales for company 1001 are 234.23. During the course of July, company 1001 places four orders, in the amounts of 23.40, 11.21, 34.56, and 11.11. These values need to be added to the YTD_Sales in the master table for company 1001, in order to update the master table. This process is referred to as Posting transactions. After the July transactions are posted to the master table, it looks like the following table.
Master Table
The master and transaction tables must have at least one field in common. Although they do not have to have the same field names, they must be the same field type. In the previous example, the master and transaction table both have an ID field. To create a Post Operation using the Genie:
In the AlphaMovies Control Panel, dispolay the Operations tab, and click New. The Create New Operation dialog box appears.
Select "Post Records", and select the master table in this Operation, which is the "Invoice" table.
Click Create Using Genie.
In the Transaction Table dialog box, select the "Items" table, and click Next. The Determine a Matching Record dialog box appears.
In this dialog box, you specify how Alpha Anywhere determines matching records. You can use the Advanced Options to specify that Alpha Anywhere check only the matching records in the master table that satisfy a specified filter condition.
Select "Invoice_Number" in the master and transaction table drop-down list boxes, and click Next. The Posting Rules dialog box appears.
Use this dialog box to define a posting rule or rules.
Fill in the Posting Rules dialog box as shown.
1. Select "Amount" in the Update the value in list.
2. Select "Adding to it" in the next list.
3. Enter the following expression into the value in field: @Items->Quantity*@Items->Sales_Price.
You can make the Posting Operation conditional by specifying a condition in which Alpha Anywhere posts the value.
To specify that Alpha Anywhere posts the values to the master table in only some cases, use the Expression Builder. You can include fields from the transaction and master tables in the conditional expression. If the expression evaluates to TRUE (.T.) for a record, the value is posted; otherwise, it is not.
Keep the default for Post the Value, which is Always, and click Next. The Record Selection dialog box appears.
Select All Records and click Next. The Transaction Table Options dialog box appears. Here you can specify to update the transaction table record when it is posted to the master table.
Select No and click Next. The Finish dialog box appears.
Select Don't run the Post Operation now, just show me how the Genie has filled in the Post card. The Post Builder appears.
Click the Run button.
Click OK in the Post Operation confirmation dialog box.
In the Post Operation Result dialog box, click View Result. The Invoice table appears with the posted updated Amount from the Transaction table.
Summary
In this lesson, you learned about several data processing Operations, the Import, Append, Update, and Post Operations. Once you understand these Operations, you can apply the principles to the others. Data processing Operations help you perform large data manipulation tasks, and are particularly useful for Operations that you perform repeatedly.
What's Next?
See Database Maintenance to learn about database maintenance and several tasks that you can routinely perform to keep your database updated, backed-up, and secure.
Limitations
Desktop Applications Only
See Also